Build a Pallet Shed: The Ultimate DIY Guide for Gardeners and Outdoor Enthusiasts
Build a Pallet Shed: The Ultimate DIY Guide for Gardeners and Outdoor Enthusiasts
This comprehensive guide provides a detailed walkthrough for constructing a durable and aesthetically pleasing pallet shed. Designed for gardeners, outdoor enthusiasts, and DIY aficionados, this project offers a cost-effective solution for additional storage space. By following these instructions meticulously, you can create a functional and attractive structure to enhance your property.
Planning and Preparation: Laying the Foundation for Success
Before commencing construction, thorough planning is paramount. This phase involves several critical steps that will significantly impact the final outcome of your project.
Site Selection and Assessment
Choose a level, stable location for your pallet shed, considering factors such as sunlight exposure, proximity to power sources (if needed for future additions like lighting or electrical outlets), and ease of access. Ensure the site is free from any underground utilities or obstructions. Proper drainage is also crucial; consider grading the area to prevent water accumulation.
Material Sourcing and Assessment
The cornerstone of this project lies in securing high-quality, treated pallets. Inspect each pallet carefully for signs of rot, insect infestation, or significant damage. Prioritize pallets made from durable hardwood such as oak or pine. Avoid using pallets marked with the "HT" (heat treated) symbol only; "MB" (methyl bromide treated) pallets are potentially hazardous and should be avoided completely. Determine the number of pallets required based on your desired shed dimensions (detailed later). You will also need additional materials such as screws, nails, pressure-treated lumber for the base and framing (if necessary), roofing materials, and potentially, weather-resistant paint or sealant.
Tool Acquisition and Preparation
Gather the necessary tools to streamline the construction process. This will include:
- Measuring tape
- Level
- Hammer
- Drill with various drill bits
- Screwdriver (both Phillips and flathead)
- Saw (circular saw recommended)
- Safety glasses
- Work gloves
- Post hole digger (if using posts for support)
- Shovel
- Wheelbarrow
Ensure all tools are in good working condition before commencing construction.
Construction: Building Your Pallet Shed
With materials and tools assembled, begin the construction phase. This section details each step involved in erecting your pallet shed.
Foundation Construction
Construct a sturdy base for your shed. A simple and effective method involves using pressure-treated 4x4 lumber posts set in concrete footings. Alternatively, a concrete slab or compacted gravel base can also be employed. The choice of foundation will depend on the soil conditions and the size of your shed. Ensure the base is perfectly level to ensure the structural integrity of the entire shed.
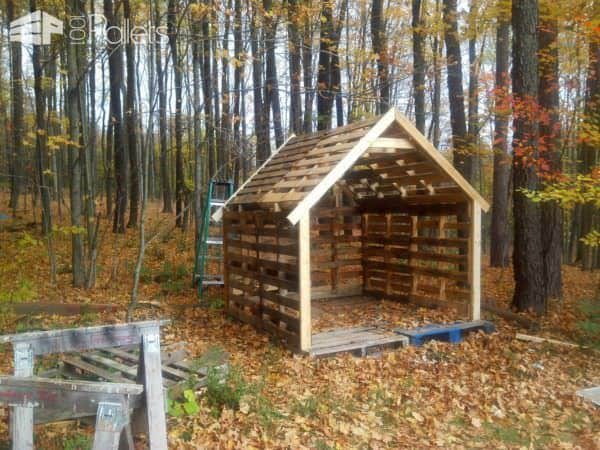
Pallet Assembly and Framing
Begin assembling the pallet walls. Depending on the desired size and design, you might need to disassemble and reconfigure some pallets to create a cohesive structure. Use screws to create a strong and lasting bond between the pallets. For added stability, reinforce the corners using additional lumber. Create a framework from pressure-treated lumber to support the roof and provide additional strength to the structure. Secure this framework to the pallets using screws or nails.
Roof Construction
The roof design can vary depending on preference. A simple gable roof is relatively easy to construct and provides excellent water runoff. Use pressure-treated lumber to build the roof trusses. Then, cover the trusses with chosen roofing materialâ€" corrugated metal sheets, plywood with roofing felt, or even recycled materials like heavy-duty plastic sheeting are all viable options. Secure the roofing material according to manufacturer instructions.
Door and Window Installation (Optional)
If desired, incorporate a door and/or windows into your shed design. For the door, you can either repurpose a suitable pallet section or use a pre-fabricated door. Frame the opening with additional lumber to provide a secure fit. Windows can be added similarly, ensuring proper sealing to prevent drafts and water ingress.
Finishing Touches
Once the main structure is complete, apply a weather-resistant sealant or paint to protect the wood from the elements and enhance the aesthetics of your shed. This will significantly extend the lifespan of your pallet shed. Consider adding landscaping features around the shed to enhance the overall look.
Safety Precautions: Ensuring a Safe Construction Process
Safety should always be the utmost priority when undertaking any DIY project. Adhere to these crucial safety measures:
- Wear appropriate safety gear, including safety glasses, work gloves, and sturdy footwear.
- Use caution when handling power tools; always follow the manufacturer's instructions.
- Ensure proper ventilation when working with paints, sealants, and other chemicals.
- Dispose of waste materials responsibly, in accordance with local regulations.
- If unsure about any aspect of the construction, consult with a qualified professional.
Customization and Enhancements: Personalizing Your Pallet Shed
The design of your pallet shed can be further customized to suit your specific needs and preferences. Consider these enhancement options:
- Shelving: Install interior shelving to maximize storage space.
- Lighting: Add interior lighting for enhanced visibility.
- Ventilation: Incorporate vents or louvers to improve air circulation.
- Electrical Outlets: Install electrical outlets if needed for power tools or other electrical devices. (Ensure all electrical work is completed by a qualified electrician).
- Landscaping: Plant climbing vines or other landscaping elements to integrate the shed into its surroundings.
Conclusion: Reap the Rewards of Your DIY Project
Building a pallet shed is a rewarding undertaking that combines creativity, practicality, and cost-effectiveness. By following this guide and exercising diligence, you can construct a sturdy and aesthetically pleasing structure that will serve as a valuable addition to your property for years to come. Remember to always prioritize safety and enjoy the process of creating your own personalized outdoor storage solution.
Comments
Post a Comment