DIY Pallet Shed: A Step-by-Step Guide to Building a Shed for Your Tools
DIY Pallet Shed: A Step-by-Step Guide to Building a Shed for Your Tools
Hey there, fellow DIY enthusiasts! So, you're thinking about building your own shed, huh? That's awesome! Building a shed can seem daunting, but with a little planning and some elbow grease, you can have a fantastic, functional storage space for all your tools and gear. And the best part? We're going to build it using reclaimed pallets â€" saving you money and being eco-friendly at the same time! Let's dive in!
1. Planning and Preparation: Laying the Foundation for Success
Before you even think about hammering a single nail, you need a solid plan. This isn't rocket science, but a little prep work will save you headaches down the line.
1.1 Choosing Your Pallets
Not all pallets are created equal! Look for pallets that are in good condition â€" free from rot, significant damage, or protruding nails. Heat-treated pallets (marked with HT) are generally safer to use than those treated with methyl bromide (MB). You'll need a sufficient number to create the walls and roof of your desired shed size. I'd recommend visiting your local recycling center or asking businesses if they have any they're discarding. You might even be able to get them for free!
1.2 Design and Measurements
Sketch out your shed design. Consider the size you need â€" how much stuff do you want to store? A simple rectangular design is easiest for beginners. Measure carefully and make sure your measurements are accurate. Remember to account for the thickness of the pallets when calculating overall dimensions. Don't forget about the door opening â€" it needs to be wide enough to get your largest tools in and out.
1.3 Gathering Your Tools and Materials
You'll need a few essential tools: a hammer, a pry bar (for separating pallet boards if needed), a circular saw or hand saw, measuring tape, a level, safety glasses, work gloves, screws (exterior-grade are best), and a drill (with appropriate drill bits). You might also want to invest in some pallet jacks if you have to carry a lot of pallets. Consider purchasing additional lumber for structural support if the pallets themselves don't provide enough strength.
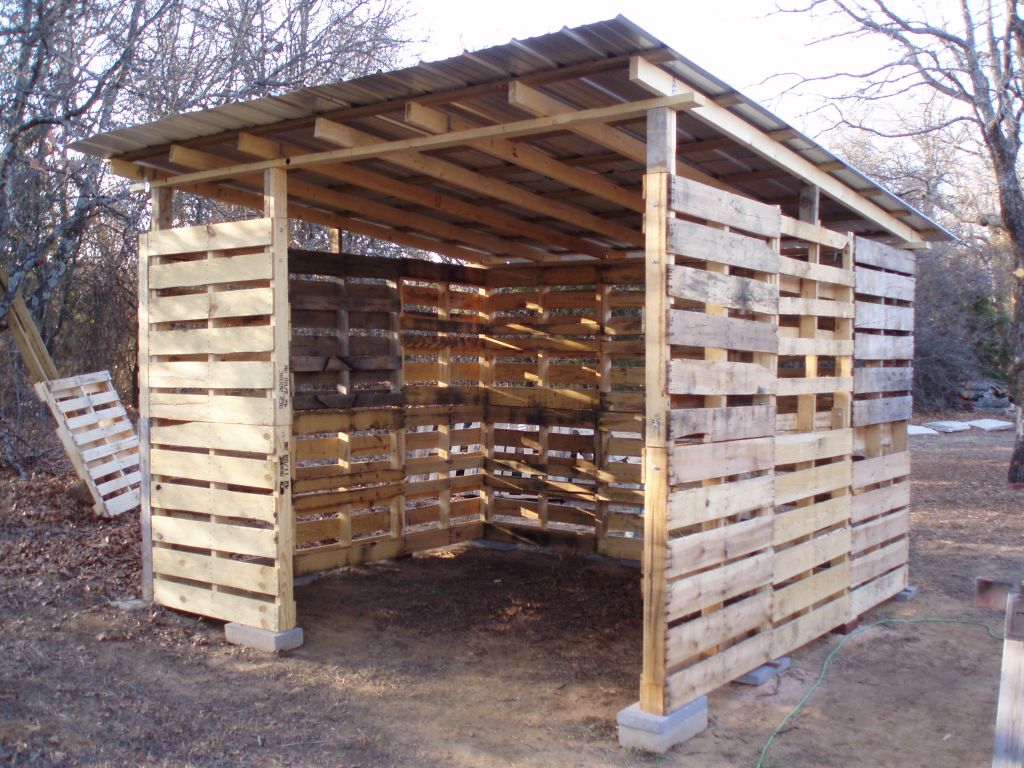
2. Construction: Building Your Pallet Shed
Now for the fun part! Let's put those pallets to good use.
2.1 Building the Floor
Start by laying out your foundation. This could be a simple concrete slab, compacted gravel, or even just a level patch of ground. Place your pallets on the foundation, ensuring they're level and tightly fitted together. You can use additional screws to secure them to each other. If your pallets aren't all exactly the same size, you may need to use additional wood to bridge the gaps.
2.2 Constructing the Walls
This is where you'll need to get creative! You can stack pallets vertically to create walls, securing them together with screws. Consider adding bracing between the pallets for extra stability. Ensure you plan the placement of your door opening in advance. You might want to use some sturdy 2x4s as a frame to ensure the area you're leaving open for the door is strong enough.
2.3 Building the Roof
For the roof, you have several options. A simple gable roof is relatively easy to construct. You might need to cut some pallets to fit the angles of the roof. Consider using plywood or other sheeting materials on top of the pallets for weather protection. You can also use a single-slope roof for a simpler approach. Make sure your roof has sufficient overhang to protect the walls from the elements.
2.4 Adding a Door
Cut an opening for the door in the wall frame that you’ve already built. You can build a simple door frame from scrap wood and hang a door. If you're feeling ambitious you could even build your door from reclaimed pallet wood, creating a beautiful, rustic shed. Consider adding a latch or lock for security.
3. Finishing Touches: Enhancing Your Pallet Shed
Almost there! Now let's add those finishing touches to make your pallet shed look great and last longer.
3.1 Weatherproofing
This is crucial! Apply a wood sealant or weatherproofing paint to protect your pallets from moisture and the elements. This will help extend the life of your shed significantly. Consider two coats for optimal protection.
3.2 Adding Shelves and Organization
Once the shed is built, consider adding shelves for better organization. You can use more reclaimed wood or even repurposed materials for this. Get creative with your storage solutions to maximize space.
4. Safety First!
Throughout this whole process, remember safety first! Always wear safety glasses and gloves. Be careful when handling sharp tools and nails. If you're unsure about any step, don't hesitate to consult with someone who has more experience.
Commonly Asked Questions
Here are some common questions people have about building a pallet shed:
Q: Are all pallets safe to use?
A: No. Pallets treated with methyl bromide (MB) can be harmful. Look for heat-treated pallets (marked HT) for safety.
Q: How long will a pallet shed last?
A: With proper weatherproofing, a pallet shed can last for several years. The lifespan depends on the quality of the pallets, the climate, and the level of maintenance.
Q: Can I build a larger shed using this method?
A: Yes, but you'll need more pallets and additional structural supports, such as 2x4s or other lumber to reinforce the structure, especially for larger dimensions. Consider consulting building codes in your area for larger structures.
Q: What kind of foundation do I need?
A: A simple level surface is often sufficient for a smaller shed. For larger sheds or areas prone to flooding, a concrete slab is recommended.
Q: What if my pallets are damaged?
A: Carefully inspect your pallets. If there are significant structural issues, you might want to replace those pallets. For minor damage, you can often repair them with wood filler and sealant.
Q: Is it difficult to build a pallet shed?
A: The difficulty level depends on your DIY skills and the complexity of your design. A simple rectangular shed is relatively easy to build, even for beginners. For more complex designs, you might need some additional experience.
I hope this guide has inspired you to build your own awesome pallet shed! Remember to take your time, plan carefully, and most importantly, have fun!


Comments
Post a Comment